Jupyter lab을 사용하여 코드를 작성할 때(.ipynb 파일)와 .py파일에서 디버깅 모드로 파이썬 코드를 실행할 때 항상 import부분에서 시간낭비를 하곤 한다.
각각 작업 경로를 root로 설정해주거나 launch.json 파일을 조금 수정해주면 간단히 끝나는데, 이미 설정되어 (jupyter lab 또는 notebook) 창을 켜놓고, .ipynb 파일을 생성한 상태에서 작업 경로를 설정해주는 방법을 알아보자.
목차
주로 사용하는 모듀은 'os' 모듈이다.
import os
파이썬 기본 모듈이기 때문에 별도로 다운받을 필요가 없다.
현재 작업 경로 확인 및 변경
.ipynb 파일 내에서
먼저 코딩중인 ipython 파일 내에서 작업 경로를 확인 및 변경하는 방법을 알아보자.
현재 작업 경로는 아래와 같은 방법으로 확인할 수 있다.
print(os.getcwd())

현재 작업경로는 "/root"임을 알 수 있다.
만약 "/root/" 디렉토리 안에 원하는 모듈(.py 파일)을 갖고 있다면, "import [원하는모듈].py"로 바로 import하거나, 만약 그 모듈의 경로가 "/root/directory1/directory2/module.py"라면 에 따라 "import directory1.directory2.module"와 같이 절대 경로를 사용하여 import해줄 수 있다.
그런데 만약 어차피 작업할 모든 파일이 directory2에 들어있다면, 작업 경로를 해당 디렉토리 경로로 바꾸어 더 편하게 import를 해줄 수 있다.
os.chdir("/root/바꿀/작업/경로")예를 들어, 위와 같은 상황이었다면 다음과 같이 바꿔준다.
os.chdir("/root/directory1/directory2/")
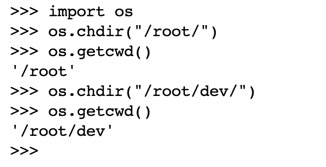
print(os.getcwd()) # 바뀌었는지 확인
아래는 root 하위의 dev라는 디렉토리로 작업 경로를 바꿔준 결과이다.

터미널에서
터미널에서도 python을 실행하여 똑같이 진행할 수 있다.
먼저, 터미널에서 'python'을 입력하여 python을 실행한다.

그리고 위와 같은 방법으로 한 줄씩 입력해주면 된다.
python 실행환경을 빠져나오려면 'exit()'이나 Ctrl+D를 입력한다.
VSCode 디버깅 모드 작업 경로 변경
VSCode의 디버깅 모드는 .py파일로 작성된 코드를 디버깅할 때 매우 편하다. 그런데, 단축키 'f5'로 실행을 시켰을 때, (특히 여러 경로가 복잡하게 얽혀있는 경우) VSCode에서 자동으로 현재 경로를 작업 경로(working directory)로 설정하여 실행하기 때문에, 직접 작성한 모듈의 경로를 불러올 때 문제가 되곤 한다.
예를 들어, '/root/dev'가 전체 프로젝트의 작업 경로('.')라 해보자. 그런데 "/root/dev/module1" 디렉토리의 "/root/dev/module1/example.py" 코드가 문제가 있어 디버깅하려고 한다. 코드는 아래와 같다.
from module2 import example2

example2()
즉, 기존 작업 경로 "/root/dev"의 다른 하위 폴더 "/root/dev/module2"에 있는 example2라는 함수를 활용하는 경우이다. 이때, 디버깅 모드로 example1.py 파일을 실행하면 ModuleNotFoundError가 발생한다.
이는 디버깅 모드에서 파일을 실행할 때, VSCode가 해당 파일이 있는 경로를 자동으로 작업 경로로 설정하기 때문이다. 사실 실행할 때 launch.json이라는 파일을 생성하는데, 이 파일을 수정해주면 된다.
"cmd(⌘) + shift(⇧) + P"를 눌러 아래와 같이 'launch' 관련된 command를 검색해보자.

그러면 아래와 같은 VSCode가 자동으로 생성해준 실행 설정 파일을 열어볼 수 있다.
{
    // Use IntelliSense to learn about possible attributes.
    // Hover to view descriptions of existing attributes.
    // For more information, visit: https://go.microsoft.com/fwlink/?linkid=830387
    "version": "0.2.0",
    "configurations": [
        {
            "name": "Python: Current File",
            "type": "python",
            "request": "launch",
            "program": "${file}",
            "console": "integratedTerminal",
            "justMyCode": true
        }
    ]
}
여기서, "cwd" (change working directory), "env" (environment variables)를 추가해준다.
{
    // Use IntelliSense to learn about possible attributes.
    // Hover to view descriptions of existing attributes.
    // For more information, visit: https://go.microsoft.com/fwlink/?linkid=830387
    "version": "0.2.0",
    "configurations": [
        {
            "name": "Python: Current File",
            "type": "python",
            "request": "launch",
            "program": "${file}",
            "console": "integratedTerminal",
            "cwd": "${directory_to_change}",
            "env": { "PYTHONPATH": "directory_to_change"},
            "justMyCode": true
        }
    ]
}
필자는 ${} (특정 경로를 변수로 받아오는 표현)없이 절대 경로로 원하는 작업 경로 및 PYTHONPATH 경로를 설정해준다.
위 예시의 경우
"cwd": "/root/dev"
"env": { "PYTHONPATH": "/root/dev"}
와 같이 추가할 것이다.
추가로, shell script에서 파이썬을 실행할 때 option으로 주던 argument들을 다음과 같이 줄 수 있다.
{
    // Use IntelliSense to learn about possible attributes.
    // Hover to view descriptions of existing attributes.
    // For more information, visit: https://go.microsoft.com/fwlink/?linkid=830387
    "version": "0.2.0",
    "configurations": [
        {
            "name": "Python: Current File",
            "type": "debugpy"
            "request": "launch",
            "program": "${file}",
            "console": "integratedTerminal",
            "cwd": "${directory_to_change}",
            "env": { "PYTHONPATH": "directory_to_change"},
            "args": [
            	"--config_file", "config_file_path",
                "--gpus", "0",
                "--debug"
            ],
            "justMyCode": true
        }
    ]
}
args 옵션 내용을 대괄호('[]')로 묶어주고, "option1", "option1 내용", "option2", "option2 내용" ... 과 같이 option과 그에 해당하는 내용을 순차적으로 입력해준다. "store_true" 타입, 즉 옵션을 입력하는 것으로 해당 옵션은 true 값이 되는 경우 위 예시와 같이 --debug를 단순히 추가해주면 된다.
위 내용을 만약 shell script로 실행한다면 다음과 같이 실행할 것이다.
export PYTHONPATH=directory_to_change
python python_file_path.py \
    --config_file config_file_path \
    --gpus "0" \
    --debug
수정한 launch.json 파일을 저장 후 실행해보면 정상적으로 작업 경로와 PYTHONPATH 환경 변수가 설정되었음을 알 수 있다.


최근댓글